Preventing measures against an attacker who tries to grab your shirt. The prevention should be according to the situation…

G2 Training Program
Preventing measures against an attacker who tries to grab your shirt. The prevention should be according to the situation…
Video transcript
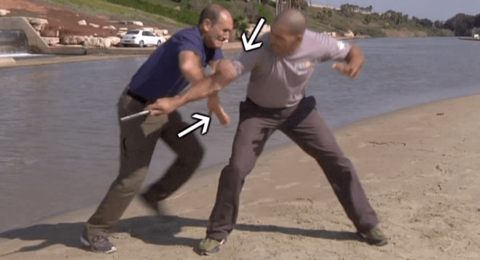
Preventing measures against an attacker who tries to grab your shirt. The prevention should be according to the situation, the distance, the timeline. Here’s the example of defending the attacker’s attempt, deflecting his hand, and moving away from the danger zone, while talking to the opponent, warning him, keeping him away with the voice. It is possible to defend and counter-attack, but also to defend and control. Prevent the attempt to grab, control the opponent, push him away from you, talking, warning, giving orders is part of the technique here.
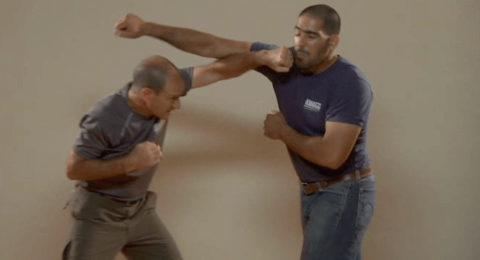
Against an opponent who grabs and also punches. Here, the attacker really attacks. Of course a shirt grab by itself is not a dangerous grab, but here, the attacker uses the grab of the shirt to set you up for a strike. It is obvious that you need to deal with the real problem, and the real problem is the attack, and naturally the attacker. So block the attack; deflect the attack depending what attack it is. Here it’s a circular attack so block it, and then as needed, continue with counter-attacks, move away from the danger zone. In this simple example here, it is easy to defend and easy to counter-attack. Sometimes you will need to move away a bit and use with the first counter-attacks, the legs, meaning first you kick and then continue as needed.
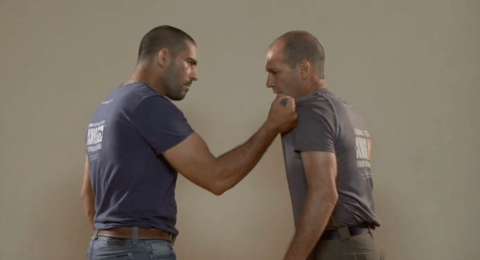
Against a one-hand shirt grab, a release with rotating the upper arm. This technique includes rotating of the upper arm plus moving away from the opponent, retreating a bit. Simultaneously you’re rotating the hand of the side that was caught and moving backwards with the opposite leg. This enables the upper arm to rotate near the body, applying some sort of a pressure or seizure action on the fingers of the opponent. To have more efficient release one should rotate a straight arm. The upper arm applies pressure on the shirt and the fingers of the opponent. Pay attention that you don’t do a circle deeper toward the forearm of the opponent. The pressure on the shirt, on the cloth, and the fingers takes the shirt, takes the cloth out from the grab. It doesn’t matter if the attacker grabs you with the left or the right hand. What matters is which side he’s grabbing you. If he grabs your left side, rotate the left arm. Or if he grabs at your right side, rotate your right arm. The retreat and the rotation freed you. Now move away from the danger zone. Best is circle around the opponent. Talking to the opponent can be part of the technique, to de-escalate the situation.
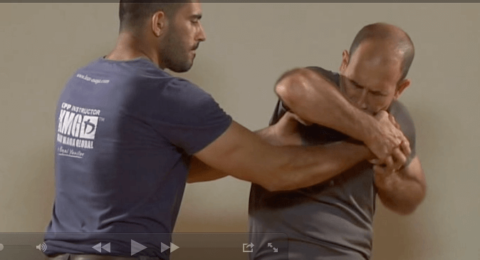
Upper arm rotation and lock on the elbow against the one-hand shirt grab. Practically, this is a troubleshooting technique, meaning you tried to do the previous technique, moving away, rotating the upper arm and releasing yourself. However, in this technique you didn’t manage to apply pressure on the palm and the fingers of the opponent, but on the wrist of the opponent. Against a strong grab you will not be able to free yourself. However, a strong arm rotation created a torque in the arm of the opponent who’s grabbing you. His arm was rotated, his elbow came up, your technique did not free you. However, it brought the opponent into a position in which you can press his elbow down, creating a lock.
So the rotating arm is landing diagonally on the attacker’s arm. More or less, your palm should be directed with the hook on the area of the triceps of the opponent. Your other arm should join on the level of the elbow of the attacker. So with two arms wrapped around the elbow of the opponent from three sides: from the outside, from the inside, and from above. You’re creating pressure downwards and towards yourself, towards your stomach area, while moving backwards, flattening the opponent on his stomach. At this moment you can even talk to the opponent, warn him. Definitely move away from the danger zone. It is important to be able release yourself from different grabs like this and not only to strike. Striking may be inappropriate and maybe even illegal in such cases.
Release from a one-hand shirt grab from behind. Here we demonstrate the problem. An attacker from behind pulls your shirt to turn you, and then strikes. Go with the pull and turn towards your opponent while raising your arm high over the grab. So a straight arm is raised to the side of your head. As soon as possible, look at the opponent and try evaluate what the opponent is doing. Your response should be appropriate one. While turning if the attacker was also attacking, the rotating, the high arm, could do a defense, and then you should counter-attack with the rear hand. Or, the arm that you lift passed before colliding, before deflecting the attack, so your back hand should be defending. The back hand can do inside defense or sliding inside defense with the strike in the end. Simultaneously with the defense or immediately afterwards, start delivering counter-attacks in order to neutralize this ability of the attacker to continue. In the basic practice, should drill with your partner different possibilities. Meaning, sometimes somebody pulls you from behind and doesn’t attack. Sometimes the attacker grabs, pulls, and delivers a straight punch or delayed straight punch or circular attack. Just practice how to deal with these sort of problems.

A. Spinning Attacks, Strikes and Kicks


C. Sliding Defense Against a Straight Punch
Notes: Both defenses are done with the front hand against the opposite hand (i.e. - left vs. right).
D. Double Hand Defense Against Kicks of an Unknown Height

E. Defense Against One-Handed Shirt Grabs
F. Escaping From Two-Handed Shirt Grabs

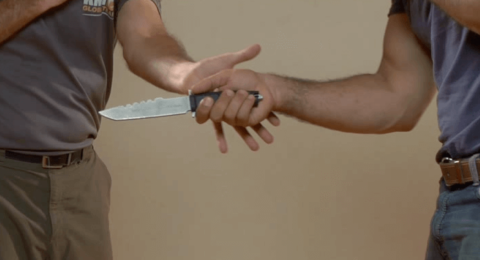
H. Defending Against Knife Attacks - Straight Stabs
Note: Practice techniques 1 and 4 from a passive stance. Start practicing techniques 2 and 3 from an appropriate ready stance. In the later stages, practice from a minimized ready stance. All without returning to the initial channel of attack
I. Defense Against Slashing Knife Attacks
J. Defending Against a Straight Stab or Thrust with a Stick

K. Dealing with a Continuing Attacker – Whilst Defending Against Different Kicks

Note: see G-1 for more information about protective and safety gear.

1. Escaping a One-Handed Shirt Grab